ROOT object inspector of TFile
The subject of this chapter is CINT, ROOT command line interpreter and script processor. First, we explain what CINT is and why ROOT uses it. Then we discuss CINT as the command line interpreter, the CINT commands, and CINT extensions to C++ are discussed. CINT as the script interpreter is explained and illustrated with several examples.
CINT, which is pronounced ['sint], is a C++ interpreter. An interpreter takes a program, in this case a C++ program, and carries it out by examining each instruction and in turn executing the equivalent sequence of machine language. For example, an interpreter translates and executes each statement in the body of a loop “n” times. It does not generate a machine language program. This may not be a good example, because most interpreters have become ‘smart’ about loop processing.
A compiler on the other hand, takes a program and makes a machine language executable. Once compiled the execution is very fast, which makes a compiler best suited for the case of “built once, run many times”. For example, the ROOT executable is compiled occasionally and executed many times. It takes anywhere from 1 to 45 minutes to compile ROOT for the first time (depending on the CPU). Once compiled it runs very fast. On the average, a compiled program runs roughly ten times faster than an interpreted one. Because compiling is slow, using a compiler is cumbersome for rapid prototyping when one changes and rebuilds as often as once per minute. An interpreter, on the other hand, is the perfect tool for code that changes often and runs a few times. Most of the time, interpreters are built for scripting languages, such as JavaScript, IDL, or Python. These languages are specifically designed to be interpreted rather than compiled. The advantage of using a normally compiled language is that code can be compiled once the prototype is debugged and refined. CINT is a C++ interpreter, making it a tool for rapid prototyping and scripting in C++. It is also available as a stand-alone product, see http://root.cern.ch/cint. This page also has links to all the CINT documentation. The downloadable tar file contains documentation, the CINT executable, and many demo scripts that are not included in the regular ROOT distribution. Here is the list of CINT main features:
Supports K&R-C, ANSI-C, and ANSI-C++
CINT covers 85-95% of the C++, ANSI-C and K&R-C language constructs. It supports multiple inheritance, virtual function, function overloading, operator overloading, default parameters, templates, and much more. CINT is robust enough to interpret its own source code. CINT is not designed to be a 100% ANSI/ISO compliant C++ language processor. It is a portable scripting language environment, which is close enough to the standard C++.
Interprets Large C/C++ source code
CINT can handle huge C/C++ source code, and loads source files quickly. It can interpret its own, over 70,000 lines source code - more than 150,000 lines.
Enables mixing Interpretation & Native Code
Depending on the need for execution speed or the need for interaction, one can mix native code execution and interpretation. “makecint” encapsulates arbitrary C/C++ objects as precompiled libraries. A precompiled library can be configured as a dynamically linked library. Accessing interpreted code and precompiled code can be done seamlessly in both directions.
Provides a Single-Language solution
CINT/makecint is a single-language environment. It works with any ANSI-C/C++ compiler to provide the interpreter environment on top of it.
Simplifies C++
CINT is meant to bring C++ to the non-software professional. C++ is simpler to use in the interpreter environment. It helps the non-software professional (the domain expert) to talk the same language as the software counterpart.
Provides RTTI and a Command Line
CINT can process C++ statements from command line, dynamically define/erase class definition and functions; load/unload source files and libraries. Extended Run Time Type Identification is provided, allowing you to explore imaginative new ways of using C++.
CINT has a built-in debugger for complex C++ code and a text based class browser is part of it.
It is portable.
CINT works on number of operating systems: HP-UX, Linux, SunOS, Solaris, AIX, Alpha-OSF, IRIX, FreeBSD, NetBSD, NEC EWS4800, NewsOS, BeBox, WindowsNT, Windows9x, MS-DOS, MacOS, VMS, NextStep, Convex.
Start up a ROOT session by typing root at the system prompt.
> root
*******************************************
*                                         *
*        W E L C O M E  to  R O O T       *
*                                         *
*   Version   5.16/00      27 June 2007   *
*                                         *
*  You are welcome to visit our Web site  *
*          http://root.cern.ch            *
*                                         *
*******************************************
FreeType Engine v2.1.9 used to render TrueType fonts.
Compiled on 28 June 2007 for linux with thread support.

CINT/ROOT C/C++ Interpreter version 5.16.21, June 22, 2007
Type ? for help. Commands must be C++ statements.
Enclose multiple statements between { }.
root[0]
Now we create a TLine object:
root[] TLine l
root[] l.Print()
TLine  X1=0.000000 Y1=0.000000 X2=0.000000 Y2=0.000000
root[] l.SetX1(10)
root[] l.SetY1(11)
root[] l.Print()
TLine  X1=10.000000 Y1=11.000000 X2=0.000000 Y2=0.000000
root[] .g
...
0x4038f080 class TLine l , size=40
0x0        protected: Double_t fX1 //X of 1st point
0x0        protected: Double_t fY1 //Y of 1st point
0x0        protected: Double_t fX2 //X of 2nd point
0x0        protected: Double_t fY2 //Y of 2nd point
0x0        private: static class TClass* fgIsA
Here we note:
Terminating with ‘;‘ is not required, see “ROOT/CINT Extensions to C++”.
Emacs style command line editing.
Raw interpreter commands start with a dot (.).
root[] .class TLine
=================================================
class TLine //A line segment
size=0x38
(tagnum=289,voffset=-1,isabstract=0,parent=-1,gcomp=0:-1,d21=~cd=f7)
List of base class-------------------------------
0x0        public: TObject //Basic ROOT object
0xc        public: TAttLine //Line attributes
List of member variable--------------------------
Defined in TLine
(compiled) 0x0        protected: Double_t fX1 //X of 1st point
(compiled) 0x0        protected: Double_t fY1 //Y of 1st point
(compiled) 0x0        protected: Double_t fX2 //X of 2nd point
(compiled) 0x0        protected: Double_t fY2 //Y of 2nd point
(compiled) 0x8a3a718  static const enum TLine:: kLineNDC
(compiled) 0x0        private: static TClass* fgIsA
List of member function--------------------------
filename       line:size busy function type and name  (in TLine)
(compiled) 0:0    0 public: virtual void ~TLine(void);
(compiled) 0:0    0 public: TLine TLine(void);
(compiled) 0:0    0 public: TLine TLine(Double_t x1,Double_t y1,
                                        Double_t x2,Double_t y2);
(compiled) 0:0    0 public: TLine TLine(const TLine& line);
(compiled) 0:0    0 public: virtual void Copy(TObject& line) const;
(compiled) 0:0    0 public: virtual Int_t DistancetoPrimitive(
                                                  Int_t px,Int_t py);
...
(compiled) 0:0    0 public: static int ImplFileLine(void);
(compiled) 0:0    0 public: static const char* ImplFileName(void);
(compiled) 0:0    0 public: static int DeclFileLine(void);
(compiled) 0:0    0 public:TLine& operator=(const TLine&);
root[] l.Print(); > test.log
root[] l.Dump(); >> test.log
root[] ?
Here we see:
Use .class as quick help and reference
Unix like I/O redirection (; is required before >)
Use ? to get help on all ‘‘raw’’ interpreter commands
Use @ to abort a multi-line command
Now let us execute a multi-line command:
root[] {
end with '}', '@':abort > TLine l;
end with '}', '@':abort > for (int i = 0; i < 5; i++) {
end with '}', '@':abort >    l.SetX1(i);
end with '}', '@':abort >    l.SetY1(i+1);
end with '}', '@':abort >    l.Print();
end with '}', '@':abort > }
end with '}', '@':abort > }
TLine  X1=0.000000 Y1=1.000000 X2=0.000000 Y2=0.000000
TLine  X1=1.000000 Y1=2.000000 X2=0.000000 Y2=0.000000
TLine  X1=2.000000 Y1=3.000000 X2=0.000000 Y2=0.000000
TLine  X1=3.000000 Y1=4.000000 X2=0.000000 Y2=0.000000
TLine  X1=4.000000 Y1=5.000000 X2=0.000000 Y2=0.000000
root[] .q
Here we note:
A multi-line command starts with a { and ends with a }.
Every line has to be correctly terminated with a ; (like in “real’’ C++).
All objects are created in globalscope.
There is no way to back up; you are better off writing a script.
Use .q to exit root.
ROOT script files contain pure C++ code. They can contain a simple sequence of statements like in the multi command line example given above, but also arbitrarily complex class and function definitions.
Let us start with a script containing a simple list of statements (like the multi-command line example given in the previous section). This type of script must start with a { and end with a } and is called an un-named script. Assume the file is called script1.C
{
#include <iostream.h>
   cout << " Hello" << endl;
   float x = 3.;
   float y = 5.;
   int   i = 101;
   cout <<" x = "<<x<<" y = "<<y<<" i = "<<i<< endl;
}
To execute the stream of statements in script1.C do:
root[] .x script1.CThis loads the contents of file script1.C and executes all statements in the interpreter’s global scope. One can re-execute the statements by re-issuing “.x script1.C” (since there is no function entry point). Scripts are searched for in the Root.MacroPath as defined in your .rootrc file. To check which script is being executed use:
root[] .which script1.C
/home/rdm/root/./script1.CLet us change the un-named script to a named script. Copy the file script1.C to script2.C and add a function statement:
#include <iostream.h>

int run()
{
   cout << " Hello" << endl;
   float x = 3.;
   float y = 5.;
   int   i= 101;
   cout <<" x = "<< x <<" y = "<< y <<" i = "<< i << endl;
   return 0;
}
Notice that no surrounding {} are required in this case. To execute function run() in script2.C do:
root[] .L script2.C             // load script in memory
root[] run()                    // execute entry point run
Hello
x = 3 y = 5 i = 101
(int)0
root[] run()                    // execute run() again
Hello
x = 3 y = 5 i = 101
(int)0
root[] .func                    // list all functions known by CINT
filename       line:size busy function type and name
...
script2.C          4:9   0 public: int run();
The last command shows that run() has been loaded from file script2.C, that the function run() starts on line 4 and is 9 lines long. Notice that once a function has been loaded it becomes part of the system just like a compiled function. Now we copy the file script2.C to the script3.C and change the function name from run() to script3(int j = 10):
#include <iostream.h>
int script3(int j = 10) {
   cout << " Hello" << endl;
   float x = 3.;
   float y = 5.;
   int   i = j;
   cout <<" x = "<< x <<", y = "<< y <<", i = "<< i << endl;
   return 0;
}
To execute script3() in script3.C type:
root[] .x script3.C(8)This loads the contents of file script3.C and executes entry point script3(8). Note that the above only works when the filename (minus extension) and function entry point are both the same.
The function script3() can still be executed multiple times:
root[] script3()
Hello
x = 3, y = 5, i = 10
(int)0
root[] script3(33)
Hello
x = 3, y = 5, i = 33
(int)0
In a named script, the objects created on the stack are deleted when the function exits. For example, this scenario is very common. You create a histogram in a named script on the stack. You draw the histogram, but when the function exits the canvas is empty and the histogram disappeared. To avoid histogram from disappearing you can create it on the heap (by using new). This will leave the histogram object intact, but the pointer in the named script scope will be deleted. Since histograms (and trees) are added to the list of objects in the current directory, you can always retrieve them to delete them if needed.
root[] TH1F *h = (TH1F*)gDirectory->Get("myHist");              // or
root[] TH1F *h = (TH1F*)gDirectory->GetList()->FindObject("myHist");
In addition, histograms and trees are automatically deleted when the current directory is closed. This will automatically take care of the clean up. See “Input/Output”.
You may want to execute a script conditionally inside another script. To do it you need to call the interpreter and you can do that with TROOT::ProcessLine(). The example $ROOTSYS/tutorials/tree/cernstaff.C calls a script to build the root file if it does not exist:
void cernstaff() {
   if (gSystem->AccessPathName("cernstaff.root")) {
      gROOT->ProcessLine(".x cernbuild.C");
   }
ProcessLine takes a parameter, which is a pointer to an int or to a TInterpreter::EErrorCode to let you access the CINT error code after an attempt to interpret. This will contain the CINT error as defined in enum TInterpreter::EErrorCode.
Variables created on the command line and in un-named scripts are in the interpreter’s global scope, which makes the variables created in un-named scripts available on the command line event after the script is done executing. This is the opposite of a named script where the stack variables are deleted when the function in which they are defined has finished execution.
When running an un-named script over again and this is frequently the case since un-named scripts are used to prototype, one should reset the global environment to clear the variables. This is done by calling gROOT->Reset(). It is good practice, and you will see this in the examples, to begin an un-named script with gROOT->Reset(). It clears the global scope to the state just before executing the previous script (not including any logon scripts). The gROOT->Reset() calls the destructor of the objects if the object was created on the stack. If the object was created on the heap (via new) it is not deleted, but the variable is no longer associated with it. Creating variables on the heap in un-named scripts and calling gROOT->Reset() without you calling the destructor explicitly will cause a memory leak. This may be surprising, but it follows the scope rules. For example, creating an object on the heap in a function (in a named script) without explicitly deleting it will also cause a memory leak. Since when exiting the function only the stack variables are deleted. The code below shows gROOT->Reset() calling the destructor for the stack variable, but not for the heap variable. In the end, neither variable is available, but the memory for the heap variable is not released. Here is an example:
root[] gDebug = 1
(const int)1
root[] TFile stackVar("stack.root","RECREATE")
TKey Writing 86 bytes at address 64 for ID= stack.root Title=
root[] TFile *heapVar = new TFile("heap.root","RECREATE")
TKey Writing 84 bytes at address 64 for ID= heap.root Title=
We turn on Debug to see what the subsequent calls are doing. Then we create two variables, one on the stack and one on the heap.
root[] gROOT->Reset()
TKey Writing 48 bytes at address 150 for ID= stack.root Title=
TKey Writing 54 bytes at address 198 for ID= stack.root Title=
TFile dtor called for stack.root
TDirectory dtor called for stack.root
When we call gROOT->Reset(), CINT tells us that the destructor is called for the stack variable, but it does not mention the heap variable.
root[] stackVar
Error: No symbol stackVar in current scope
FILE:/var/tmp/faaa01jWe_cint LINE:1
*** Interpreter error recovered ***
root[] heapVar
Error: No symbol heapVar in current scope
FILE:/var/tmp/gaaa01jWe_cint LINE:1
*** Interpreter error recovered ***
Neither variable is available in after the call to reset.
root[] gROOT->FindObject("stack.root")
(class TObject*)0x0
root[] gROOT->FindObject("heap.root")
(class TObject*)0x106bfb30
The object on the stack is deleted and shows a null pointer when we do a FindObject. However, the heap object is still around and taking up memory.
Note gROOT->Reset() should be never called in a named script or a compiled program.
Lets create a small class TMyClass and a derived class TChild. The virtual method TMyClass::Print()is overridden in TChild. Save this in file called script4.C.
#include <iostream.h>

class TMyClass {
   private:
      float   fX;     //x position in centimeters
      float   fY;     //y position in centimeters
   public:
      TMyClass() { fX = fY = -1; }
      virtual void Print() const;
      void SetX(float x) { fX = x; }
      void SetY(float y) { fY = y; }
};
void TMyClass::Print() const  // parent print method
{
   cout << "fX = " << fX << ", fY = " << fY << endl;
}
class TChild : public TMyClass {
   public:
      void Print() const;
};
void TChild::Print() const  // child print metod
{
   cout << "This is TChild::Print()" << endl;
   TMyClass::Print();
}
To execute script4.C do:
root[] .L script4.C
root[] TMyClass *a = new TChild
root[] a->Print()
This is TChild::Print()
fX = -1, fY = -1
root[] a->SetX(10)
root[] a->SetY(12)
root[] a->Print()
This is TChild::Print()
fX = 10, fY = 12
root[] .class TMyClass
=====================================================
class TMyClass
size=0x8 FILE:script4.C LINE:3
List of base class-----------------------------------
List of member variable------------------------------
Defined in TMyClass
0x0        private: float fX
0x4        private: float fY
List of member function------------------------------
Defined in TMyClass
filename       line:size busy function type and name
script4.C         16:5    0 public: class TMyClass TMyClass(void);
script4.C         22:4    0 public: void Print(void);
script4.C         12:1    0 public: void SetX(float x);
script4.C         13:1    0 public: void SetY(float y);
root[] .q
As you can see, an interpreted class behaves just like a compiled class.
There are some limitations for a class created in a script:
They cannot inherit from TObject. Currently the interpreter cannot patch the virtual table of compiled objects to reference interpreted objects.
Because the I/O is encapsulated in TObject and a class defined in a script cannot inherit from TObject, it cannot be written to a ROOT file.
See “Adding a Class” for ways how to add a class with a shared library and with ACLiC.
A powerful feature of CINT is the ability to debug interpreted functions by means of setting breakpoints and being able to single step through the code and print variable values on the way. Assume we have script4.C still loaded, we can then do:
root[] .b TChild::Print
Break point set to line 26 script4.C
root[] a.Print()

26   TChild::Print() const
27   {
28      cout << "This is TChild::Print()" << endl;
FILE:script4.C LINE:28 cint> .s

311  operator<<(ostream& ostr,G__CINT_ENDL& i) {return(endl(ostr));
FILE:iostream.h LINE:311 cint> .s
}
This is TChild::Print()

29      MyClass::Print();
FILE:script4.C LINE:29 cint> .s

16   MyClass::Print() const
17   {
18      cout << "fX = " << fX << ", fY = " << fY << endl;
FILE:script4.C LINE:18 cint> .p fX
(float)1.000000000000e+01
FILE:script4.C LINE:18 cint> .s

311  operator<<(ostream& ostr,G__CINT_ENDL& i) {return(endl(ostr));
FILE:iostream.h LINE:311 cint> .s
}
fX = 10, fY = 12

19   }

30   }

2    }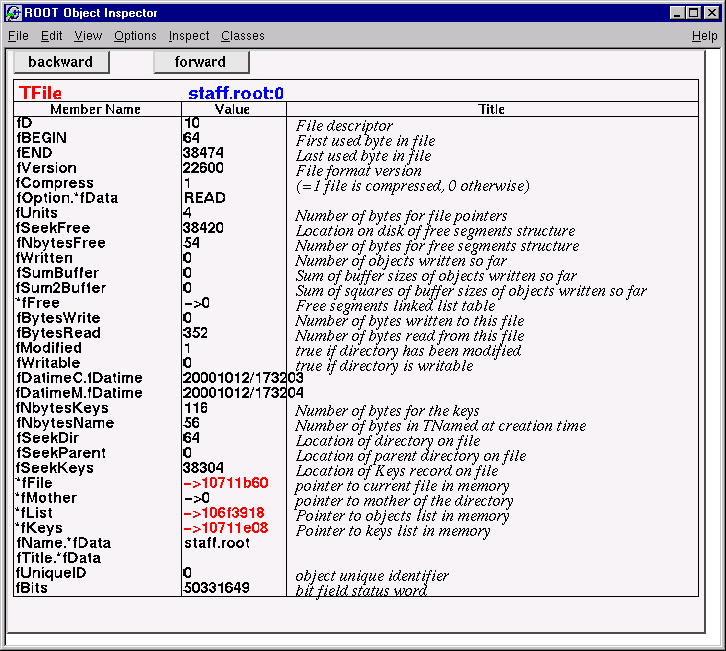
root[] .qAn object of a class inheriting from TObject can be inspected, with the Inspect() method. The TObject::Inspect method creates a window listing the current values of the objects members. For example, the next picture is of TFile.
root[] TFile f("staff.root")
root[] f.Inspect()
You can see the pointers are in red and can be clicked on to follow the pointer to the object. If you clicked on fList, the list of objects in memory and there were none, no new canvas would be shown. On top of the page are the navigation buttons to see the previous and next screen.
ROOT object inspector of TFile

The object inspector of fKeys, the list of keys in the memory
In the next example, we demonstrate three of the most important extensions ROOT/CINT makes to C++. Start ROOT in the directory $ROOTSYS/tutorials (make sure to have first run ".x hsimple.C"):
root[] f = new TFile("hsimple.root")
(class TFile*)0x4045e690
root[] f.ls()
TFile**         hsimple.root
TFile*         hsimple.root
KEY: TH1F     hpx;1   This is the px distribution
KEY: TH2F     hpxpy;1 py ps px
KEY: THProfile        hprof;1 Profile of pz versus px
KEY: TNtuple  ntuple;1        Demo ntuple
root[] hpx.Draw()
NULL
Warning in <MakeDefCanvas>: creating a default canvas with name c1
root[] .q
The first command shows the first extension; the declaration of f may be omitted when “new” is used. CINT will correctly create f as pointer to object of class TFile.
The second extension is shown in the second command. Although f is a pointer to TFile we don’t have to use the pointer de-referencing syntax “->” but can use the simple “.” notation.
The third extension is more important. In case CINT cannot find an object being referenced, it will ask ROOT to search for an object with an identical name in the search path defined by TROOT::FindObject(). If ROOT finds the object, it returns CINT a pointer to this object and a pointer to its class definition and CINT will execute the requested member function. This shortcut is quite natural for an interactive system and saves much typing. In this example, ROOT searches for hpx and finds it in simple.root.
The fourth is shown below. There is no need to put a semicolon at the end of a line. The difference between having it and leaving it off is that when you leave it off the return value of the command will be printed on the next line. For example:
root[] 23+5  // no semicolon prints the return value
(int)28
root[] 23+5; // semicolon no return value is printed
root[]
Be aware that these extensions do not work when a compiler replaces the interpreter. Your code will not compile, hence when writing large scripts, it is best to stay away from these shortcuts. It will save you from having problems compiling your scripts using a real C++ compiler.
Instead of having CINT interpret your script there is a way to have your scripts compiled, linked and dynamically loaded using the C++ compiler and linker. The advantage of this is that your scripts will run with the speed of compiled C++ and that you can use language constructs that are not fully supported by CINT. On the other hand, you cannot use any CINT shortcuts (see ROOT/CINT Extensions to C++) and for small scripts, the overhead of the compile/link cycle might be larger than just executing the script in the interpreter.
ACLiC will build a CINT dictionary and a shared library from your C++ script, using the compiler and the compiler options that were used to compile the ROOT executable. You do not have to write a makefile remembering the correct compiler options, and you do not have to exit ROOT.
Before you can compile your interpreted script you need to add include statements for the classes used in the script. Once you did that, you can build and load a shared library containing your script. To load it use the command .L and append the file name with a “+”.
root[] .L MyScript.C+
root[] .files
...
*file="/home/./MyScript_C.so"
The + option generates the shared library and names it by taking the name of the file “filename” but replacing the dot before the extension by an underscore and by adding the shared library extension for the current platform. For example on most platforms, hsimple.cxx will generate hsimple_cxx.so. If we execute a .files command we can see the newly created shared library is in the list of loaded files.
The + command rebuild the library only if the script or any of the files it includes are newer than the library. When checking the timestamp, ACLiC generates a dependency file which name is the same as the library name, just replacing the ‘so’ extension by the extension ‘d’. For example on most platforms, hsimple.cxx will generate hsimple_cxx.d.
To ensure that the shared library is rebuilt you can use the ++ syntax:
root[] .L MyScript.C++To build, load, and execute the function with the same name as the file you can use the .x command. This is the same as executing a named script. You can have parameters and use .xor .X. The only difference is you need to append a + or a ++.
root[] .x MyScript.C+ (4000)
Creating shared library /home/./MyScript_C.so
You can select whether the script in compiled with debug symbol or with optimization by appending the letter ‘g’ or ‘O’ after the ‘+’ or ‘++’. Without the specification, the script is compiled with the same level of debugging symbol and optimization as the currently running ROOT executable. For example:
root[] .L MyScript.C++gwill compile MyScript.C with debug symbols; usually this means giving the -g option to compiler.
root[] .L MyScript.C++Owill compile MyScript.C with optimizations; usually this means giving the -O option to compiler. The syntax:
root[] .L MyScript.C++is using the default optimization level. The initial default is to compile with the same level of optimization as the root executable itself. The default can be changed by:
root[] gSystem->SetAclicMode(TSystem::kDebug);
root[] gSystem->SetAclicMode(TSystem::kOpt);
Note that the commands:
root[] .L MyScript.C+g
root[] .L MyScript.C+O
respectively compile MyScript.C with debug and optimization if the library does not exist yet; they will not change the debug and the optimization level if the library already exist and it is up to date. To use ACLiC from compiled code or from inside another macro, we recommend using the ProcessLine() method of TROOT. For example, in one script you can use ACLiC to compile and load another script.
gROOT->ProcessLine(".L MyScript.C+")
gROOT->ProcessLine(".L MyScript.C++")You can get the include path by typing:
root[] .includeYou can append to the include path by typing:
root[] .include $HOME/mypackage/includeIn a script you can append to the include path:
gSystem->AddIncludePath(" -I$HOME/mypackage/include ")You can also overwrite the existing include path:
gSystem->SetIncludePath(" -I$HOME/mypackage/include ")The $ROOTSYS/include directory is automatically appended to the include path, so you do not have to worry about including it. To add library that should be used during linking of the shared library use something like:
gSystem->AddLinkedLibs("-L/my/path -lanylib");This is especially useful for static libraries. For shared ones you can also simply load them before trying to compile the script:
gSystem->Load("mydir/mylib");ACLiC uses the directive fMakeSharedLibs to create the shared library. If loading the shared library fails, it tries to output a list of missing symbols by creating an executable (on some platforms like OSF, this does not HAVE to be an executable) containing the script. It uses the directive fMakeExe to do so. For both directives, before passing them to TSystem::Exec(), it expands the variables $SourceFiles, $SharedLib, $LibName, $IncludePath, $LinkedLibs, $ExeNameand$ObjectFiles. See SetMakeSharedLib() for more information on those variables. When the file being passed to ACLiC is on a read only file system, ACLiC warns the user and creates the library in a temporary directory:
root[] .L readonly/t.C++
Warning in <ACLiC>: /scratch/aclic/subs/./readonly is not writable!
Warning in <ACLiC>: Output will be written to /tmp
Info in <TUnixSystem::ACLiC>: creating shared library
/tmp//scratch/aclic/subs/./readonly/t_C.so
To select the temporary directory ACLiC looks at $TEMP, $TEMP_DIR, $TEMPDIR, $TMP, $TMPDIR, $TMP_DIRor uses /tmp (or C:/). Also, a new interface TSystem::Get/SetBuildDir is introduced to let users select an alternative ‘root’ for building of the ACLiC libraries. For filename/full/path/name/macro.C, the library is created as fBuildDir/full/path/name/macro_C.so.
You can direct what is added to the dictionary generated by ACLiC in two ways. The simplest way is to add at the end of script (i.e. after the symbols have been defined) something like:
#if defined(__MAKECINT__)
#pragma link C++ class MyOtherClass;
#endif
You can also write this portion of code in a file name MyScript_linkdef.h where the suffix '_linkdef'is the prefix defined by the key ‘ACLiC.Linkdef‘ in the currently used resource file (usually .rootrcor$ROOTSYS/etc/system.rootrc) and the prefix is the name of your script.
In ROOT 3.05/03 and above, the default behavior of rootcint is to not link in (i.e. generate the dictionary for) any of the symbols. In particular, this means that the following lines are now, in the general case, unnecessary.
#pragma link off all globals;
#pragma link off all classes;
#pragma link off all functions;
This also means that linking the instantiation of a class template:
#pragma link C++ class mytemplate<int>;ONLY links this specific class. In previous versions of ROOT, depending on many factors, this might also have included the linking of many other instantiation of class template used directly or indirectly by 'mytemplate'.
A typical case would have been to rely on:
#pragma link C++ class vector<MyClass>;to also induce the generation of the iterators. You now need to request them explicitly. Another advantage of the change is that now, if you omit the ‘pragma link off’ line from your linkdef file, you can actually sprinkle the ‘pragma link C++ class’ across as many of you header as file as you need.
See the documentation of rootcint for details how pragma can be used.
NOTE: You should not call ACLiC with a script that has a function called main(). When ACLiC calls rootcint with a function called main it tries to add every symbol it finds while parsing the script and the header files to the dictionary. This includes the system header files and the ROOT header files. It will result in duplicate entries at best and crashes at worst, because some classes in ROOT need special attention before they can be added to the dictionary.
ACLiC executes two steps and a third one if needed. These are:
Calling rootcint to create a CINT dictionary. rootcint is a ROOT specific version of makecint, CINT generic dictionary generator.
Calling the compiler to build the shared library from the script
If there are errors, it calls the compiler to build a dummy executable to report clearly unresolved symbols.
ACLiC makes a shared library with a CINT dictionary containing the classes and functions declared in the script. It also adds the classes and functions declared in included files with the same name as the script file and any of the following extensions: .h, .hh, .hpp, .hxx, .hPP, .hXX. This means that, by default, you cannot combine scripts from different files into one library by using #include statements; you will need to compile each script separately. In a future release, we plan to add the global variables declared in the script to the dictionary also. If you are curious about the specific calls, you can raise the ROOT debug level: gDebug=3 and ACLiC will print these steps. If you need to keep the intermediate files around, for example when debugging the script using gdb, use gDebug=7.
The best way to develop portable scripts is to make sure you can always run them with both, the interpreter and with ACLiC. To do so, do not use the CINT extensions and program around the CINT limitations. When it is not possible or desirable to program around the CINT limitations, you can use the C preprocessor symbols defined for CINT and rootcint.
The preprocessor symbol __CINT__ is defined for both CINT and rootcint. The symbol __MAKECINT__ is only defined in rootcint.
Use !defined(__CINT__) || defined(__MAKECINT__) to bracket code that needs to be seen by the compiler and rootcint, but will be invisible to the interpreter.
Use !defined(__CINT__)to bracket code that should be seen only by the compiler and not by CINT or rootcint.For example, the following will hide the declaration and initialization of the array gArray from both CINT and rootcint.
#if !defined(__CINT__)
int gArray[] = { 2, 3, 4};
#endif
Because ACLiC calls rootcint to build a dictionary, the declaration of gArray will not be included in the dictionary, and consequently, gArray will not be available at the command line even if ACLiC is used. CINT and rootcint will ignore all statements between the "#if !defined (__CINT__)" and “#endif". If you want to use gArray in the same script as its declaration, you can do so. However, if you want use the script in the interpreter you have to bracket the usage of gArray between #if's, since the definition is not visible. If you add the following preprocessor statements:
#if !defined(__CINT__)
int gArray[] = { 2, 3, 4};
#elif defined(__MAKECINT__)
int gArray[];
#endif
gArray will be visible to rootcint but still not visible to CINT. If you use ACLiC, gArray will be available at the command line and be initialized properly by the compiled code.
We recommend you always write scripts with the needed include statements. In most cases, the script will still run with the interpreter. However, a few header files are not handled very well by CINT.
These types of headers can be included in interpreted and compiled mode:
The subset of standard C/C++ headers defined in $ROOTSYS/cint/include.
Headers of classes defined in a previously loaded library (including ROOT own). The defined class must have a name known to ROOT (i.e. a class with a ClassDef).
A few headers will cause problems when they are included in interpreter mode, because the interpreter itself already includes them. In general, the interpreter needs to know whether to use the interpreted or compiled version. The mode of the definition needs to match the mode of the reference.
Here are the cases that need to be excluded in interpreted mode, but included for rootcint. Bracket these with: !defined(__CINT__) || defined(__MAKECINT__)
All CINT headers, see $ROOTSYS/cint/inc
Headers with classes named other than the file name. For example Rtypes.h and GuiTypes.h.
Headers with a class defined in libraries before the library is loaded. For example: having #include "TLorentzVector.hbefore gSystem->Load("libPhysics"). This will also cause problems when compiling the script, but a clear error message will be given. With the interpreter, it may core dump. Bracket these type of include statements with#if !defined (__CINT__),this will print an error in both modes.
Hiding header files from rootcint that are necessary for the compiler but optional for the interpreter can lead to a subtle but fatal error. For example:
#ifndef __CINT__
#include "TTree.h"
#else
class TTree;
#endif

class subTree : public TTree {
};
In this case, rootcint does not have enough information about the TTree class to produce the correct dictionary file. If you try this, rootcint and compiling will be error free, however, instantiating a subTree object from the CINT command line will cause a fatal error. In general, it is recommended to let rootcint see as many header files as possible.
Reflection is the ability of a programming language to introspect its data structures and interact with them at runtime without prior knowledge. Reflex provides reflection capabilities for C++. With the ROOT v5.08, Reflex is an optional package. It will become a mandatory package (loaded by default) with the next ROOT versions. In order to build it you have to ./configure --enable-reflex
Inside ROOT Reflex is thought to replace the current reflection system, which is inherent to CINT. This is an ongoing work and not part of this release. Nevertheless, Reflex dictionaries can be used inside ROOT while populating the current CINT data structures via a special gateway called Cintex (see “Cintex”).
In order to use reflection a dictionary of the data structures involved has to be generated. Before generating the dictionaries, the source code has to be parsed and the information extracted. In the ROOT environment, there are two ways to generate dictionaries for the Reflex library.
rootcint -reflex -f module/src/G__Module.cxx -c module/inc/TMod1.h
module/inc/TMod2.h module/inc/Linkdef.hgcc compiler as a source code parser: With this option a special program called “gccxml” has to be installed. This program is an extension to gcc and produces xml code out of parsed C++ definitions which will be further used to generate the proper dictionary source code via a python script. For parsing C++ constructs using the gcc compiler the command will be:rootcint -gccxml -f module/src/G__Module.cxx -c module/inc/TMod1.h
module/inc/TMod2.h module/inc/Linkdef.hNote: an installation of Python and gccxml is required for using this option.
You can use selection files to tell genreflex what it should generate a dictionary for. If you do not use it, it will generate a dictionary for all types in the files passed at the command line, or when specifying --deep for all types it finds.
The selection file is passed to genreflex with the -s parameters like this:
genreflex -s selection.xml header1.h header2.h.It is an XML file with the following structure:
<lcgdict>
[<selection>]
<class [name="classname"] [pattern="wildname"]
[file_name="filename"] [file_pattern="wildname"]
[id="xxxx"] [type="vector"]/>
<class name="classname" >
<field name="m_transient" transient="true"/>
<field name="m_anothertransient" transient="true"/>
<properties prop1="value1" [prop2="value2"]/>
</class>
<function [name="funcname"] [pattern="wildname"]
[proto_name="name(int)"] [proto_pattern="name(int,*)"] />
<enum [name="enumname"] [patter="wildname"] />
<variable [name="varname"] [patter="wildname"] />
[</selection>]
<exclusion>
<class [name="classname"] [pattern="wildname"] />
<method name="unwanted" />
</class>
...
</lcgdict>The program parsing the header files and providing genreflex with the information what’s in them is called GCCXML. It only sees templates if they are instantiated. See the C++ standard on when template instantiation happens. The rule of thumb is: if you design a templated class then it probably does not happen in that templated class’s header.
So you need to help GCCXML. There are two common approaches: the struct member, and the “proper” C++ way.
This is the preferred method, but it is not widely used. Suppose you have a templated template class C and a templated function template T A::f(const T&) const;. You can instantiate them (say with template parameter long long) using:
#ifdef __GCCXML__
// GCCXML explicit template instantiation block
template class C<long long>;
template long long A::f(const long long&);
#endif
You can even put this into your regular header file: it is surrounded by an #ifdef __GCCXML__ and will thus be invisible to any other compiler.
Suppose you have a templated template class C and a templated function template T f(const T&) const; defined in file C.h. For the templated class you can use:
#include "C.h"
#ifdef __GCCXML__
// GCCXML explicit template instantiation block
namespace {
   struct GCCXML_DUMMY_INSTANTIATION {
      C<long long> dummyMember;
   };
}
#endif
Often people put these instantiations into a separate header which in turn #includes the actual header, such that the C++ sources do not see the GCCXML_DUMMY_INSTANTIATION.
Gccxml is a front-end to the gcc compiler suite, which generates xml code out of parsed C++ definitions. Gccxml needs to be installed in order to use this option. Now we are using a patched version of gccxml release 0.6.0 called (0.6.0_patch3). This installation can be downloaded from http://spi.cern.ch/lcgsoft/.
Once the dictionary sources have been generated, they can be compiled into a library and loaded via the Reflex builder system. The dictionary information can be used via the Reflex API. For this purpose, Reflex provides eight classes, which exploit the whole functionality of the system.
Reflex offers a simple yet powerful API to access Reflex reflection database. The following classes are defined in the namespace ROOT::Reflex and documented at http://root.cern.ch/root/html/REFLEX_Index.html.
An object is an abstraction of a user object. It contains the information about its type and it is location in memory.
Type is an abstraction of a C++ type. Types in Reflex are:
A scope is an abstraction of a C++ type. It holds information such as its declaring scope, it is underlying scope and it is data/function members. Scopes are:
A member lives inside a scope and is of a given Type. Members can be distinguished as:
Base holds the information about the inheritance structure of classes. It contains information such as the offset to the base class and the type of the base class.
Properties are key/value pairs where the key is a string and the value an Any object (Boost::Any). Any objects can hold any type of information be it a string, int or any arbitrary object. Properties can be attached to Types, Scopes and Members and hold any kind of information that is not specific to C++. Examples for Properties would be the class author, a description of a member or the class id.
A MemberTemplate is an abstraction of a templated member. It holds the information about its template parameters and a list of its instantiations.
A TypeTemplate is an abstraction of a templated type (e.g. class). It holds the same information as the MemberTemplate (e.g. template parameters, list of instantiations)
The Reflex package lives in the namespace ROOT::Reflex. Below some examples of usage of the package are given. For further information please see the documentation of the different API classes.
The next examples will refer to the example class MyClass:
class MyClass {

public:
   MyClass() : fMem1(47), fMem2("foo") { }
   int GetMem1() { return fMem1; }
   int GetMem1(int i) { return fMem1*i; }
   void SetMem1(int i) { fMem1 = i; }
   std::string GetMem2() { return fMem2; }
   void SetMem2(const std::string & str) { fMem2 = str; }

private:
   int fMem1;
   std::string fMem2;
};
The first thing after loading a dictionary (which is done at the moment at the same time as the implemenation library), will be to look up a certain Type or Scope.
Type t1 = Type::ByName("MyClass");Every API class provides the operator bool, which will return true if the information retrieved for this instance is valid and further actions on this instance can be taken.
if (t1) {
   if (t1.IsClass()) std::cout << "Class ";
   std::cout << t1.Name();
}
As a class is also a scope (as enum and union) we can now also iterate over its members. This can be done either with stl like iterators or with an iteration by number:
For (Member_Iterator mi = t1.DataMember_Begin();
     mi != DataMember_End(); ++mi) {
   std::cout << (*mi).Name(SCOPED) << " "
             << (*mi).TypeOf().Name(QUALIFIED);
}

Member m;
for (size_t i = 0; i < t1.FunctionMemberSize(); ++i) {
   m = t1.FunctionMemberAt(i);
   std::cout << m.Name() << " " << m.TypeOf().Name();
   for (Type_Iterator ti = m.FunctionParaeter_Begin(); ti !=
   m.FunctionParameter_End(); ++ti) {
      std::cout << (*ti).Name() << std::endl;
   }
}
It is not only possible to introspect information through Reflex but also take actions. E.g. instantiate classes/structs, invoke functions, set data members, etc. The instantiation of a type which represents a class struct can be done with:
Object o1 = t1.Construct();which will call the default constructor for this type and allocate the memory for this type inside the Object. The Object will also contain the type information constructed.
Now the object of a certain type has been constructed one may interact with it. E.g. getting the value of a data member can be done via which will return an Object of the data member in question.
Object mem_obj = o1.Get("fMem1");
int real_value = 0;
if (mem_obj.TypeOf().Name() == "int)
   int real_value = Object_Cast<int>(mem_obj);
It is also possible to invoke function members via the Object class. A function member can be looked up by name, if the member is overloaded an additional parameter which is the string representation of the type can be passed. Currently parameters for the function to invoke shall be passed as a vector of memory addresses of the parameters. This may change in the future to pass a vector of Objects.
int par1 = 2;
std::vector<void*> parVec;
parVec.push_back(&par1);
int ret_val = Object_Cast<int>(
   o1.Invoke("GetMem1","int (int)",parVec));
Calling the destructor of an Object can be done via, this will call both the destructor and of the object type and deallocate the memory.
o1.Destruct();Cintex is an optional package inside ROOT. In order to build it you have to
./configure --enable-cintex at the ROOT configuration step.The purpose of the Cintex package is to bridge uni-directional information from the Reflex to the CINT dictionary system. This package will be needed as long as the unification of the Reflex and CINT dictionaries has not been completed. This unification is work ongoing. In order to use Cintex functionality it will be needed to load the Cintex library (e.g. libCintex.so on linux systems) and enable the Cintex gateway with
Cintex::Enable();After these two steps have been taken, any Reflex dictionary information should be propagated to the CINT dictionaries and subsequently usable inside the CINT environment (e.g. from the root prompt). If wanted debugging information while loading Reflex dictionaries can be turned on with (any number greater than 0 can be used as argument but will not make any difference in the amount of debugging output for the time being).
Cintex::SetDebug(1);