WARNING: This documentation is not maintained anymore. Some part might be obsolete or wrong, some part might be missing but still some valuable information can be found there. Instead please refer to the ROOT Reference Guide and the ROOT Manual. If you think some information should be imported in the ROOT Reference Guide or in the ROOT Manual, please post your request to the ROOT Forum or via a Github Issue.
We begin by showing you how to use ROOT interactively. There are two examples to click through and learn how to use the GUI. We continue by using the command line, and explaining the coding conventions, global variables and the environment setup. If you have not installed ROOT, you can do so by following the instructions in the appendix, or on the ROOT web site: http://root.cern.ch/root/Availability.html
Before you can run ROOT you need to set the environment variable ROOTSYS and change your path to include root/bin and library path variables to include root/lib. Please note: the syntax is for bash, if you are running tcsh you will have to use setenv instead of export.
$ export ROOTSYS=$HOME/root$ export PATH=$PATH:$ROOTSYS/binOn HP-UX, before executing the interactive module, you must set the library path:
$ export SHLIB_PATH=$SHLIB_PATH:$ROOTSYS/libOn AIX, before executing the interactive module, you must set the library path:
$ [ -z "$LIBPATH" ] && export LIBPATH=/lib:/usr/lib
$ export LIBPATH=$LIBPATH:$ROOTSYS/lib
On Linux, Solaris, Alpha OSF and SGI, before executing the interactive module, you must set the library path:
$ export LD_LIBRARY_PATH=$LD_LIBRARY_PATH:$ROOTSYS/libOn Solaris, in case your LD_LIBRARY_PATH is empty, you should set it:
$ export LD_LIBRARY_PATH=$LD_LIBRARY_PATH:$ROOTSYS/lib:/usr/dt/libIf you use the afs version you should set (vers = version number, arch = architecture):
$ export ROOTSYS=/afs/cern.ch/sw/lcg/external/root/vers/arch/rootIf ROOT was installed in $HOME/myroot directory on a local machine, one can do:
cd $HOME/myroot
. bin/thisroot.sh       // or source bin/thisroot.sh
The new $ROOTSYS/bin/thisroot.[c]sh scripts will set correctly the ROOTSYS, LD_LIBRARY_PATH or other paths depending on the platform and the MANPATH. To run the program just type: root.
$ root
   -------------------------------------------------------------------------
  | Welcome to ROOT 6.10/01                             http://root.cern.ch |
  |                                            (c) 1995-2017, The ROOT Team |
  | Built for macosx64                                                      |
  | From heads/v6-10-00-patches@v6-10-00-25-g9f78c3a, Jul 03 2017, 11:39:44 |
  | Try '.help', '.demo', '.license', '.credits', '.quit'/'.q'              |
   -------------------------------------------------------------------------

root [0]
To start ROOT you can type root at the system prompt. This starts up Cling, the ROOT command line C/C++ interpreter, and it gives you the ROOT prompt (root[0]).
It is possible to launch ROOT with some command line options, as shown below:
%  root -?
Usage: root [-l] [-b] [-n] [-q] [dir] [[file:]data.root]
                                                [file1.C ... fileN.C]
Options:
  -b : run in batch mode without graphics
  -n : do not execute logon and logoff macros as specified in .rootrc
  -q : exit after processing command line macro files
  -l : do not show splash screen
  -x : exit on exception
 dir : if dir is a valid directory cd to it before executing

  -?       : print usage
  -h       : print usage
  --help   : print usage
  -config  : print ./configure options
-b ROOT session runs in batch mode, without graphics display. This mode is useful in case one does not want to set the DISPLAY or cannot do it for some reason.
-n usually, launching a ROOT session will execute a logon script and quitting will execute a logoff script. This option prevents the execution of these two scripts.
it is also possible to execute a script without entering a ROOT session. One simply adds the name of the script(s) after the ROOT command. Be warned: after finishing the execution of the script, ROOT will normally enter a new session.
-q process command line script files and exit.
For example if you would like to run a script myMacro.C in the background, redirect the output into a file myMacro.log, and exit after the script execution, use the following syntax:
root -b -q myMacro.C > myMacro.logIf you need to pass a parameter to the script use:
root -b -q 'myMacro.C(3)' > myMacro.logBe mindful of the quotes, i.e. if you need to pass a string as a parameter, the syntax is:
root -b -q 'myMacro.C("text")' > myMacro.logYou can build a shared library with ACLiC and then use this shared library on the command line for a quicker execution (i.e. the compiled speed rather than the interpreted speed). See also “Cling the C++ Interpreter”.
root -b -q myMacro.so > myMacro.logROOT has a powerful C/C++ interpreter giving you access to all available ROOT classes, global variables, and functions via the command line. By typing C++ statements at the prompt, you can create objects, call functions, execute scripts, etc. For example:
root[] 1+sqrt(9)
(const double)4.00000000000000000e+00
root[] for (int i = 0; i<4; i++) cout << "Hello" << i << endl
Hello 0
Hello 1
Hello 2
Hello 3
root[] .q
To exit the ROOT session, type .q.
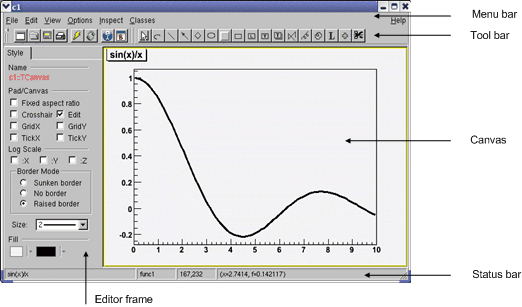
The basic whiteboard on which an object is drawn in ROOT is called a canvas (defined by the class TCanvas). Every object in the canvas is a graphical object in the sense that you can grab it, resize it, and change some characteristics using the mouse. The canvas area can be divided in several sub areas, so-called pads (the class TPad). A pad is a canvas sub area that can contain other pads or graphical objects. At any one time, just one pad is the so-called active pad. Any object at the moment of drawing will be drawn in the active pad. The obvious question is: what is the relation between a canvas and a pad? In fact, a canvas is a pad that spans through an entire window. This is nothing else than the notion of inheritance. The TPad class is the parent of the TCanvas class. In ROOT, most objects derive from a base class TObject. This class has a virtual method Draw() such as all objects are supposed to be able to be “drawn”. If several canvases are defined, there is only one active at a time. One draws an object in the active canvas by using the statement:
This instructs the object “object” to draw itself. If no canvas is opened, a default one (named “c1”) is created. In the next example, the first statement defines a function and the second one draws it. A default canvas is created since there was no opened one. You should see the picture as shown in the next figure.
root[] TF1 f1("func1","sin(x)/x",0,10)
root[] f1.Draw()
<TCanvas::MakeDefCanvas>: created default TCanvas with name c1The following components comprise the canvas window:
Menu bar - contains main menus for global operations with files, print, clear canvas, inspect, etc.
Tool bar - has buttons for global and drawing operations; such as arrow, ellipse, latex, pad, etc.
Canvas - an area to draw objects.
Status bar - displays descriptive messages about the selected object.
Editor frame - responds dynamically and presents the user interface according to the selected object in the canvas.
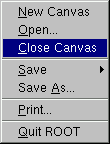
At the top of the canvas window are File, Edit, View, Options, Inspect, Classes and Help menus.
New Canvas: creates a new canvas window in the current ROOT session.
Open…: popup a dialog to open a file.
Close Canvas: close the canvas window.
Save: save the drawing of the current canvas in a format selectable from the submenu. The current canvas name is used as a file name for various formats such as PostScript, GIF, JPEG, C macro file, root file.
Save As…: popup a dialog for saving the current canvas drawing in a new filename.
Print: popup a dialog to print the current canvas drawing
Quit ROOT: exit the ROOT session
There is only one active menu entry in the Edit menu. The others menu entries will be implemented and will become active in the near future.
Editor: toggles the view of the editor. If it is selected activates and shows up the editor on the left side of the canvas window. According to the selected object, the editor loads the corresponding user interface for easy change of the object’s attributes.
Toolbar: toggles the view of the toolbar. If it is selected activates and shows up the toolbar. It contains buttons for easy and fast access to most frequently used commands and for graphics primitive drawing. Tool tips are provided for helping users.
Status Bar: toggles the view of the status bar. If it is selected, the status bar below the canvas window shows up. There the identification of the objects is displayed when moving the mouse (such as the object’s name, the object’s type, its coordinates, etc.).
Colors: creates a new canvas showing the color palette.
Markers: creates a new canvas showing the various marker styles.
Iconify: create the canvas window icon, does not close the canvas
View With…: If the last selected pad contains a 3-d structure, a new canvas is created with a 3-D picture according to the selection made from the cascaded menu: X3D or OpenGL. The 3-D image can be interactively rotated, zoomed in wire-frame, solid, hidden line or stereo mode.

Auto Resize Canvas: turns auto-resize of the canvas on/off:
Resize Canvas: resizes and fits the canvas to the window size.
Move Opaque: if selected, graphics objects are moved in opaque mode; otherwise, only the outline of objects is drawn when moving them. The option opaque produces the best effect but it requires a reasonably fast workstation or response time.
Resize Opaque: if selected, graphics objects are resized in opaque mode; otherwise, only the outline of objects is drawn when resizing them.
Interrupt: interrupts the current drawing process.
Refresh: redraws the canvas contents.
Pad Auto Exec: executes the list of TExecs in the current pad.
Statistics: toggles the display of the histogram statistics box.
Histogram Title: toggles the display of the histogram title.
Fit Parameters: toggles the display of the histogram or graph fit parameters.
Can Edit Histogram: enables/disables the possibility to edit histogram bin contents.

ROOT: inspects the top-level gROOT object (in a new canvas).
Start Browser: starts a new object browser (in a separate window).
GUI Builder: starts the GUI builder application (in a separate window).

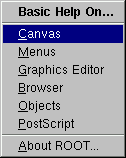
Canvas: help on canvas as a whiteboard area for drawing.
Menus: help on canvas menus.
Graphics Editor: help on primitives’ drawing and objects’ editor.
Browser: help on the ROOT objects’ and files’ browser.
Objects: help on DrawClass, Inspect and Dump context menu items.
PostScript: help on how to print a canvas to a PostScript file format.
About ROOT: pops up the ROOT Logo with the version number.
The following menu shortcuts and utilities are available from the toolbar:
 Create a new canvas window.
 Popup the Open File dialog.
 Popup the Save As… dialog.
 Popup the Print dialog.
 Interrupts the current drawing process.
 Redraw the canvas.
 Inspect the
 gROOT object.
 Create a new objects’ browser.
You can create the following graphical objects using the toolbar buttons for primitive drawing. Tool tips are provided for helping your choice.
 An Arc or circle: Click on the center of the arc, and then move the mouse. A rubber band circle is shown. Click again with the left button to freeze the arc.
 A Line: Click with the left button at the point where you want to start the line, then move the mouse and click again with the left button to freeze the line.
 An Arrow:Click with the left button at the point where you want to start the arrow, then move the mouse and click again with the left button to freeze the arrow.
 A Diamond: Click with the left button and freeze again with the left button. The editor draws a rubber band box to suggest the outline of the diamond.
 An Ellipse: Proceed like for an arc. You can grow/shrink the ellipse by pointing to the sensitive points. They are highlighted. You can move the ellipse by clicking on the ellipse, but not on the sensitive points. If, with the ellipse context menu, you have selected a fill area color, you can move a filled-ellipse by pointing inside the ellipse and dragging it to its new position.
 A Pad: Click with the left button and freeze again with the left button. The editor draws a rubber band box to suggest the outline of the pad.
 A PaveLabel: Proceed like for a pad. Type the text of label and finish with a carriage return. The text will appear in the box.
 A Pave Text: Proceed like for a pad. You can then click on the
 TPaveText object with the right mouse button and select the option InsertText.
 Paves Text: Proceed like for a
 TPaveText.
 A Poly Line: Click with the left button for the first point, move the moose, click again with the left button for a new point. Close the poly-line with a double click. To edit one vertex point, pick it with the left button and drag to the new point position.
 A Curly Line: Proceed as for the arrow or line. Once done, click with the third button to change the characteristics of the curly line, like transform it to wave, change the wavelength, etc.
 A Curly Arc: Proceed like for an ellipse. The first click is located at the position of the center, the second click at the position of the arc beginning. Once done, one obtains a curly ellipse, for which one can click with the third button to change the characteristics, like transform it to wavy, change the wavelength, set the minimum and maximum angle to make an arc that is not closed, etc.
 A Text/Latex string: Click with the left button where you want to draw the text and then type in the text terminated by carriage return. All
 TLatex expressions are valid. To move the text or formula, point on it keeping the left mouse button pressed and drag the text to its new position. You can grow/shrink the text if you position the mouse to the first top-third part of the string, then move the mouse up or down to grow or shrink the text respectively. If you position the mouse near the bottom-end of the text, you can rotate it.
 A Marker: Click with the left button where to place the marker. The marker can be modified by using the method
 SetMarkerStyle() of TSystem.
 A Graphical Cut: Click with the left button on each point of a polygon delimiting the selected area. Close the cut by double clicking on the last point. A
 TCutG object is created. It can be used as a selection for a TTree::Draw. You can get a pointer to this object with:
Once you are happy with your picture, you can select the Save as canvas.C item in the canvas File menu. This will automatically generate a script with the C++ statements corresponding to the picture. This facility also works if you have other objects not drawn with the graphics editor (histograms for example).
The ROOT graphics editor loads the corresponding object editor objEditor according to the selected object obj in the canvas respecting the class inheritance. An object in the canvas is selected after the left mouse click on it. For example, if the selected object is TAxis, the TAxisEditor will shows up in the editor frame giving the possibility for changing different axis attributes. The graphics editor can be:
Embedded - connected only with the canvas in the application window that appears on the left of the canvas window after been activated via View menu / Editor. It appears on the left side if the canvas window allowing users to edit the attributes of the selected object via provided user interface. The name of the selected object is displayed on the top of the editor frame in red color. If the user interface needs more space then the height of the canvas window, a vertical scroll bar appears for easer navigation.
Global - has own application window and can be connected to any created canvas in a ROOT session. It can be activated via the context menu entries for setting line, fill, text and marker attributes for backward compatibility, but there will be a unique entry in the near future.

The user interface for the following classes is available since ROOT v.4.04: TAttLine, TAttFill, TAttMarker, TAttText, TArrow, TAxis, TCurlyArc, TCurlyLine, TFrame, TH1, TH2, TGraph, TPad, TCanvas, TPaveStats. For more details, see “The Graphics Editor”, “The User Interface for Histograms”, “The User Interface for Graphs”.
Object oriented programming introduces objects, which have data members and methods. The next line creates an object named f1 of the class TF1 that is a one-dimensional function. The type of an object is called a class. The object itself is called an instance of a class. When a method builds an object, it is called a constructor.
In our constructor the function sin(x)/x is defined for use, and 0 and 10 are the limits. The first parameter, func1 is the name of the object f1. Most objects in ROOT have a name. ROOT maintains a list of objects that can be searched to find any object by its given name (in our example func1).
The syntax to call an object’s method, or if one prefers, to make an object to do something is:
The dot can be replaced by “->” if object is a pointer. In compiled code, the dot MUST be replaced by a “->” if object is a pointer.
So now, we understand the two lines of code that allowed us to draw our function. f1.Draw() stands for “call the method Draw() associated with the object f1 of the class TF1”. Other methods can be applied to the object f1 of the class TF1. For example, the evaluating and calculating the derivative and the integral are what one would expect from a function.
root[] f1.Eval(3)
(Double_t)4.70400026866224020e-02
root[] f1.Derivative(3)
(Double_t)(-3.45675056671992330e-01)
root[] f1.Integral(0,3)
(Double_t)1.84865252799946810e+00
root[] f1.Draw()
By default the method TF1::Paint(), that draws the function, computes 100 equidistant points to draw it. The number of points can be set to a higher value with:
Note that while the ROOT framework is an object-oriented framework, this does not prevent the user from calling plain functions.
Now we will look at some interactive capabilities. Try to draw the function sin(x)/x again. Every object in a window (which is called a canvas) is, in fact, a graphical object in the sense that you can grab it, resize it, and change its characteristics with a mouse click. For example, bring the cursor over the x-axis. The cursor changes to a hand with a pointing finger when it is over the axis. Now, left click and drag the mouse along the axis to the right. You have a very simple zoom.
When you move the mouse over any object, you can get access to selected methods by pressing the right mouse button and obtaining a context menu. If you try this on the function TF1, you will get a menu showing available methods. The other objects on this canvas are the title, a TPaveText object; the x and y-axis, TAxis objects, the frame, a TFrame object, and the canvas a TCanvas object. Try clicking on these and observe the context menu with their methods.
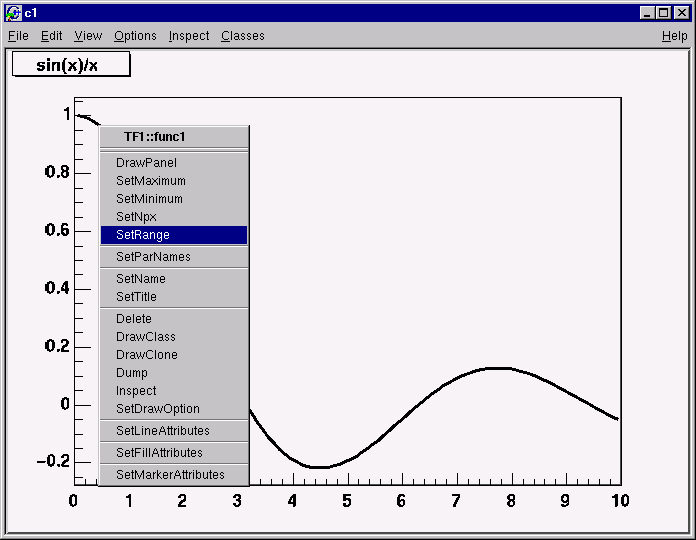
For example try selecting the SetRange() method and putting -10, 10 in the dialog box fields. This is equivalent to executing f1.SetRange(-10,10) from the command line, followed by f1.Draw(). Here are some other options you can try.
Once the picture suits your wishes, you may want to see the code you should put in a script to obtain the same result. To do that, choose Save / canvas.C entry of the File menu. This will generate a script showing the options set in the current canvas. Notice that you can also save the picture into various file formats such as PostScript, GIF, etc. Another interesting possibility is to save your canvas into the native ROOT format (.rootfile). This will enable you to open it again and to change whatever you like. All objects associated to the canvas (histograms, graphs) are saved at the same time.
Let us now try to build a canvas with several pads.
Once again, we call the constructor of a class, this time the class TCanvas. The difference between this and the previous constructor call (TF1) is that here we are creating a pointer to an object. Next, we call the method Divide() of the TCanvas class (that is TCanvas::Divide()), which divides the canvas into four zones and sets up a pad in each of them. We set the first pad as the active one and than draw the functionf1there.
All objects will be drawn in that pad because it is the active one. The ways for changing the active pad are:
Click the middle mouse button on a pad will set this pad as the active one.
Use the method TCanvas::cd() with the pad number, as was done in the example above:
Pads are numbered from left to right and from top to bottom. Each new pad created by TCanvas::Divide() has a name, which is the name of the canvas followed by _1, _2, etc. To apply the method cd() to the third pad, you would write:
TPad::cd() for the object MyC_3. ROOT will find the pad that was namedMyC_3when you typed it on the command line (see ROOT/Cling Extensions to C++).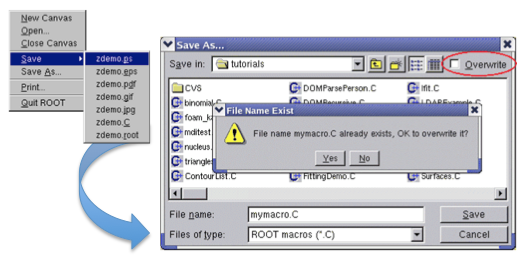
Using the File menu / Save cascade menu users can save the canvas as one of the files from the list. Please note that saving the canvas this way will overwrite the file with the same name without a warning.
All supported file types can be saved via File menu / SaveAs… This dialog gives a choice to show or suppress the confirmation message for overwriting an existing file.
If the Overwrite check box is not selected, a message dialog appears asking the user to overwrite the file (Yes/No). The user choice is saved for the next time the Save As… dialog shows up.
The Print command in the canvas File menu pops-up a print dialog where the user can specify a preferred print command and the printer name.
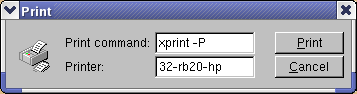
Both print parameters can be set via the new Print.Command and Print.Printer rootrc resources as follows:
# Printer settings.
WinNT.*.Print.Command:    AcroRd32.exe
Unix.*.Print.Command:     xprint -P%p %f
Print.Printer:            32-rb205-hp
Print.Directory:          .
If the %p and %f are specified as a part of the print command, they will be replaced by the specified printer name and the file name. All other parameters will be kept as they are written. A print button is available in the canvas toolbar (activated via View menu/Toolbar).
We have briefly touched on how to use the command line. There are different types of commands.
.”root[] .? //this command will list all the Cling commands
root[] .L <filename> //load [filename]
root[] .x <filename> //load and execute [filename].!” for example:You can use the command line to execute multi-line commands. To begin a multi-line command you must type a single left curly bracket {, and to end it you must type a single right curly bracket }. For example:
root[] {
end with '}'> Int_t j = 0;
end with '}'> for (Int_t i = 0; i < 3; i++)
end with '}'> {
end with '}'> j= j + i;
end with '}'> cout << "i = " << i << ", j = " << j << endl;
end with '}'> }
end with '}'> }
i = 0, j = 0
i = 1, j = 1
i = 2, j = 3
It is more convenient to edit a script than the command line, and if your multi line commands are getting unmanageable, you may want to start with a script instead.
We should say that some things are not standard C++. The Cling interpreter has several extensions. See “ROOT/Cling Extensions to C++”.
The interpreter knows all the classes, functions, variables, and user defined types. This enables ROOT to help users to complete the command line. For example, if we do not know anything about the TLine class, the Tab feature helps us to get a list of all classes starting with TL(where <TAB> means type the Tab key).
To list the different constructors and parameters for TLine use the <TAB> key as follows:
root[] l = new TLine(<TAB>
TLine TLine()
TLine TLine(Double_t x1,Double_t y1,Double_t x2,Double_t y2)
TLine TLine(const TLine& line)The meta-characters below can be used in a regular expression:
‘^’ start-of-line anchor
‘$’ end-of-line anchor
‘.’ matches any character
‘[’ start a character class
’]’end a character class
’^’negates character class if first character
‘*’Kleene closure (matches 0 or more)
’+’Positive closure (1 or more)
‘?’ Optional closure (0 or 1)
When using wildcards the regular expression is assumed to be preceded by a ‘^’ (BOL) and terminated by ‘$’ (EOL). All ‘*’ (closures) are assumed to be preceded by a ‘.’, i.e. any character, except slash _/_. Its special treatment allows the easy matching of pathnames. For example, _*.root_ will match _aap.root_, but not _pipo/aap.root_.
The escape characters are:
\ backslash
b backspace
f form feed
n new line
r carriage return
s space
t tab
e ASCII ESC character (‘033’)
DDD number formed of 1-3 octal digits
xDD number formed of 1-2 hex digits
^C C = any letter. Control code
The class TRegexp can be used to create a regular expression from an input string. If wildcard is true then the input string contains a wildcard expression.
Regular expression and wildcards can be easily used in methods like:
The method finds the first occurrence of the regular expression in the string and returns its position.
In this paragraph, we will explain some of the conventions used in ROOT source and examples.
From the first days of ROOT development, it was decided to use a set of coding conventions. This allows a consistency throughout the source code. Learning these will help you identify what type of information you are dealing with and enable you to understand the code better and quicker. Of course, you can use whatever convention you want but if you are going to submit some code for inclusion into the ROOT sources, you will need to use these.
These are the coding conventions:
Classes begin with T: TLine, TTree
Non-class types end with _t: Int_t
Data members begin with f: fTree
Member functions begin with a capital: Loop()
Constants begin with k: kInitialSize, kRed
Global variables begin with g: gEnv
Static data members begin with fg: fgTokenClient
Enumeration types begin with E: EColorLevel
Locals and parameters begin with a lower case: nbytes
Getters and setters begin with Get and Set: SetLast(), GetFirst()
Different machines may have different lengths for the same type. The most famous example is the int type. It may be 16 bits on some old machines and 32 bits on some newer ones. To ensure the size of your variables, use these pre defined types in ROOT:
Char_t Signed Character 1 byte
UChar_t Unsigned Character 1 byte
Short_t Signed Short integer 2 bytes
UShort_t Unsigned Short integer 2 bytes
Int_t Signed integer 4 bytes
UInt_tUnsigned integer 4 bytes
Long64_t Portable signed long integer 8 bytes
ULong64_t Portable unsigned long integer 8 bytes
Float_t Float 4 bytes
Double_t Float 8 bytes
Double32_t Double 8 bytes in memory, written as a Float 4 bytes
Bool_t Boolean (0=false, 1=true)
If you do not want to save a variable on disk, you can use int or Int_t, the result will be the same and the interpreter or the compiler will treat them in exactly the same way.
In ROOT, almost all classes inherit from a common base class called TObject. This kind of architecture is also used in the Java language. The TObject class provides default behavior and protocol for all objects in the ROOT system. The main advantage of this approach is that it enforces the common behavior of the derived classes and consequently it ensures the consistency of the whole system. See “The Role of TObject”.
TObject provides protocol, i.e. (abstract) member functions, for:
Object I/O (Read(), Write())
Error handling (Warning(), Error(), SysError(), Fatal())
Sorting (IsSortable(), Compare(), IsEqual(), Hash())
Inspection (Dump(), Inspect())
Printing (Print())
Drawing (Draw(), Paint(), ExecuteEvent())
Bit handling (SetBit(), TestBit())
Memory allocation (operatornew and delete, IsOnHeap())
Access to meta information (IsA(), InheritsFrom())
Object browsing (Browse(), IsFolder())
ROOT has a set of global variables that apply to the session. For example, gDirectory always holds the current directory, and gStyle holds the current style.
All global variables begin with “g” followed by a capital letter.
The single instance of TROOT is accessible via the global gROOT and holds information relative to the current session. By using the gROOT pointer, you get the access to every object created in a ROOT program. The TROOT object has several lists pointing to the main ROOT objects. During a ROOT session, the gROOT keeps a series of collections to manage objects. They can be accessed via gROOT::GetListOf... methods.
gROOT->GetListOfClasses()
gROOT->GetListOfColors()
gROOT->GetListOfTypes()
gROOT->GetListOfGlobals()
gROOT->GetListOfGlobalFunctions()
gROOT->GetListOfFiles()
gROOT->GetListOfMappedFiles()
gROOT->GetListOfSockets()
gROOT->GetListOfCanvases()
gROOT->GetListOfStyles()
gROOT->GetListOfFunctions()
gROOT->GetListOfSpecials()
gROOT->GetListOfGeometries()
gROOT->GetListOfBrowsers()
gROOT->GetListOfMessageHandlers()
These methods return a TSeqCollection, meaning a collection of objects, and they can be used to do list operations such as finding an object, or traversing the list and calling a method for each of the members. See the TCollection class description for the full set of methods supported for a collection. For example, to find a canvas called c1you can do:
This returns a pointer to a TObject, and before you can use it as a canvas you need to cast it to a TCanvas*.
gFile is the pointer to the current opened file in the ROOT session.
gDirectory is a pointer to the current directory. The concept and role of a directory is explained in the chapter “Input/Output”.
A graphic object is always drawn on the active pad. It is convenient to access the active pad, no matter what it is. For that, we have gPad that is always pointing to the active pad. For example, if you want to change the fill color of the active pad to blue, but you do not know its name, you can use gPad.
To get the list of colors, if you have an open canvas, click in the “View” menu, selecting the “Colors” entry.
gRandom is a pointer to the current random number generator. By default, it points to a TRandom3 object, based on the “Mersenne-Twister” generator. This generator is very fast and has very good random proprieties (a very long period of 10600). Setting the seed to 0 implies that the seed will be uniquely generated using the TUUID. Any other value will be used as a constant. The following basic random distributions are provided: Rndm() or Uniform(min,max), Gaus(mean,sigma), Exp(tau), BreitWigner(mean,sigma), Landau(mean,sigma), Poisson(mean), Binomial(ntot,prob). You can customize your ROOT session by replacing the random number generator. You can delete gRandom and recreate it with your own. For example:
TRandom2 is another generator, which is also very fast and uses only three words for its state.
gEnv is the global variable (of type TEnv) with all the environment settings for the current session. This variable is set by reading the contents of a .rootrc file (or $ROOTSYS/etc/system.rootrc) at the beginning of the root session. See Environment Setup below for more information.
The behavior of a ROOT session can be tailored with the options in the .rootrc file. At start-up, ROOT looks for a .rootrc file in the following order:
./.rootrc //local directory
$HOME/.rootrc //user directory
$ROOTSYS/etc/system.rootrc //global ROOT directory
If more than one .rootrc files are found in the search paths above, the options are merged, with precedence local, user, global. While in a session, to see current settings, you can do:
The rootrc file typically looks like:
# Path used by dynamic loader to find shared libraries
Unix.*.Root.DynamicPath:  .:~/rootlibs:$(ROOTSYS)/lib
Unix.*.Root.MacroPath:    .:~/rootmacros:$(ROOTSYS)/macros

# Path where to look for TrueType fonts
Unix.*.Root.UseTTFonts:     true
Unix.*.Root.TTFontPath:
...
# Activate memory statistics
Rint.Load:               rootalias.C
Rint.Logon:              rootlogon.C
Rint.Logoff:             rootlogoff.C
...
Rint.Canvas.MoveOpaque:  false
Rint.Canvas.HighLightColor: 5
The various options are explained in $ROOTSYS/etc/system.rootrc. The .rootrc file contents are combined. For example, if the flag to use true type fonts is set to true in the system.rootrc file, you have to set explicitly it false in your local .rootrc file if you do not want to use true type fonts. Removing the UseTTFontsstatement in the local .rootrc file will not disable true fonts. The value of the environment variable ROOTDEBUG overrides the value in the .rootrc file at startup. Its value is used to set gDebug and helps for quick turn on debug mode in TROOT startup.
ROOT looks for scripts in the path specified in the .rootrc file in the Root.Macro.Path variable. You can expand this path to hold your own directories.
The rootlogon.C and rootlogoff.C files are scripts loaded and executed at start-up and shutdown. The rootalias.C file is loaded but not executed. It typically contains small utility functions. For example, the rootalias.C script that comes with the ROOT distributions (located in $ROOTSYS/tutorials) defines the function edit(char *file). This allows the user to call the editor from the command line. This particular function will start the VI editor if the environment variable EDITOR is not set.
For more details, see $ROOTSYS/tutorials/rootalias.C.
You can use the up and down arrow at the command line, to access the previous and next command. The commands are recorded in the history file $HOME/.root_hist. It is a text file, and you can edit, cut, and paste from it. You can specify the history file in the system.rootrc file, by setting the Rint.Historyoption. You can also turn off the command logging in the system.rootrc file with the option: Rint.History: -
The number of history lines to be kept can be set also in .rootrc by:
Rint.HistSize:         500
Rint.HistSave:         400
The first value defines the maximum of lines kept; once it is reached all, the last HistSave lines will be removed. One can set HistSize to 0 to disable history line management. There is also implemented an environment variable called ROOT_HIST. By setting ROOT_HIST=300:200 the above values can be overriden - the first value corresponds to HistSize, the (optional) second one to HistSave. You can set ROOT_HIST=0 to disable the history.
You can track memory usage and detect leaks by monitoring the number of objects that are created and deleted (see TObjectTable). To use this facility, edit the file $ROOTSYS/etc/system.rootrc or .rootrc if you have this file and add the two following lines:
Root.ObjectStat: 1In your code or on the command line you can type the line:
This line will print the list of all active classes and the number of instances for each class. By comparing consecutive print outs, you can see objects that you forgot to delete. Note that this method cannot show leaks coming from the allocation of non-objects or classes unknown to ROOT.
The web page at: http://root.cern.ch/root/HowtoConvertFromPAW.html#TABLE gives the “translation” table of some commonly used PAW commands into ROOT. If you move the mouse cursor over the picture at: http://root.cern.ch/root/HowtoConvertFromPAW.html#SET, you will get the corresponding ROOT commands as tooltips.
ROOT has a utility called h2root that you can use to convert your HBOOK/PAW histograms or ntuple files into ROOT files. To use this program, you type the shell script command:
h2root <hbookfile> <rootfile>If you do not specify the second parameter, a file name is automatically generated for you. If hbookfile is of the form file.hbook, then the ROOT file will be called file.root. This utility converts HBOOK histograms into ROOT histograms of the class TH1F. HBOOK profile histograms are converted into ROOT profile histograms (see class TProfile). HBOOK row-wise and column-wise ntuples are automatically converted to ROOT Trees. See “Trees”. Some HBOOK column-wise ntuples may not be fully converted if the columns are an array of fixed dimension (e.g. var[6]) or if they are a multi-dimensional array.
HBOOK integer identifiers are converted into ROOT named objects by prefixing the integer identifier with the letter “h” if the identifier is a positive integer and by "h_" if it is a negative integer identifier. In case of row-wise or column-wise ntuples, each column is converted to a branch of a tree. Note that h2root is able to convert HBOOK files containing several levels of sub-directories. Once you have converted your file, you can look at it and draw histograms or process ntuples using the ROOT command line. An example of session is shown below:
// this connects the file hbookconverted.root
root[] TFile f("hbookconverted.root");

// display histogram named h10 (was HBBOK id 10)
root[] h10.Draw();

// display column "var" from ntuple h30
root[] h30.Draw("var");
You can also use the ROOT browser (see TBrowser) to inspect this file.
The chapter on trees explains how to read a tree. ROOT includes a function TTree::MakeClass to generate automatically the code for a skeleton analysis function. See “Example Analysis”.
In case one of the ntuple columns has a variable length (e.g. px(ntrack)), h.Draw("px") will histogram the px column for all tracks in the same histogram. Use the script quoted above to generate the skeleton function and create/fill the relevant histogram yourself.