Qt-ROOT implementation of TVirtualX (Qt-layer) is to provide a convenient way of creating the complex end-user applications that require both Qt GUI and ROOT features. The primary goal is to allow “embedding” the ROOT classes like TCanvas and TPad into the arbitrary Qt widgets and using it seamlessly with other Qt-based components and Qt-based third party libraries. TGQt ROOT class, a Qt-based implementation of TVirtualX interface is an optional ROOT component. The implementation was developed and is supported by the
ROOT Qt-layer requires a “good” properly configured Qt package version. To install it, one has to:
Make sure the adequate version of Qt system. Even though Qt ROOT implementation theoretically can work with any Qt release version 3.xx, we found the earlier versions of the package not reliable and recommend installing the Qt version 3.3 or higher. The package was tested against Qt 4.3 also (Qt 4.3 and higher versions contain some features introduced by TrollTech to back the ROOT applications).
Check the Qt package configuration and its compilation options are consistent with those used to compile and install ROOT alone. For Qt 3.x, we recommend configuring Qt as follows:
./configure -thread -no-xft -qt-gif -no-exeptions
I.e. one is required to build the Qt version with the “thread” support and with “no exceptions”. Generally, you are free to select the remaining Qt options like the types of the different image formats provided etc. You can check the Qt installation parameters by looking up the file:
more $QTDIR/config.status
No special flag for Qt 4.3 build and higher have been set yet to make QtRoot working.
The Qt-layer is included into the ROOT distribution kit. To install it one has to configure ROOT. The installation does not change any other components of the ROOT package. It produces several extra-shared libraries that may be dynamically loaded into the ROOT session at start time with the regular ROOT plug-in mechanism to replace the “native” GUI interface. To install Qt-layer one should follow the ROOT installation procedure providing the QTDIR environment variable points to the proper version of Qt system. Many Linux flavors come with the pre-installed Qt. May sure you are not going to pick the obsolete version.
% cd root
% ./configure <target> --enable-qt
% gmake
% gmake installThe ROOT CINT dictionary allows to call the Qt main classes directly from the ROOT command prompt is an optional component and it is not created during the “Qt-layer installation”. To build / re-build the Qt main classes ROOT dictionary one can invoke the make
% cd root
% gmake qtcint
The dictionary contains so-called Qt main classes as defined by TrollTech on the Web page: http://doc.trolltech.com/3.3/mainclasses.html. The dictionary is NOT loaded automatically and it should be loaded by the user ROOT macro as needed.
Any ROOT-based application should be configured to use Qt-layer using ROOT “Environment Setup”. The correct QTDIR environment variable to locate the proper version of Qt package should be provided as well. There are several ways to customize the ROOT setup environment to activate Qt-layer.
Look up at $ROOTSYS/etc/system.rootrc. Find there the definition of Gui.Backend and Gui.Factory:
# GUI specific settings
Gui.Backend:                native
Gui.Factory:                native
Now you can either edit the file $ROOTSYS/etc/system.rootrc or provide your own custom .rootrc redefine the options:
# GUI specific settings
Gui.Backend:                qt
Gui.Factory:                qt
If you need to switch often from native layer to qt one back and force you may find convenient to define the type of GUI using some external environment variable defining options indirectly:
# GUI specific settings
Gui.Backend:                $(GUI)
Gui.Factory:                $(GUI)
The last step is to make sure your LD_LIBRARY_PATH variable point to the $QTDIR/lib directory. Optionally, you can define the Qt Widget “look and feel” using the option Gui.Style option. The number of different styles to choose from is defined by your local Qt installation. Usually you can choose from “window”, “motif”, “cde”, “motifplus”, “platinum”, “sgi”, “compact”, “windowsxp”, “aqua” or “macintosh”. For example, the option defined below will force the “windows” look and feel on any platform.
# Qt GUI style setting
Gui.Style:                windows
The default style is so-called “native” style. That is defined by the current application environment.
As soon as you customize ROOT “Environment Setup” to use Qt-layer you can start any ROOT session or stand-alone ROOT-based applications and … even though your applications will be using the Qt package you should not see any difference. This merely means if the only thing you want to do is just use ROOT or some ROOT-based stand-alone application “as is” then you probably do not need to switch to Qt-layer and should skip this section entirely. It is recommended you communicate the lower graphical layer via the generic TVirtualX interface provided by the global gVirtualX.
“ROOT application” is the application that either instantiates the ROOT TApplication / TRint class and enters the ROOT event loop or is the shared library that can be loaded into the already running ROOT application via TSystem::Load method or via ROOT plug-in mechanism. You must neither initialize Qt QApplication nor enter the Qt event loop. Qt-layer takes care about these two steps. What you need is to instantiate the Qt object of your choice and to keep playing ROOT rules.
#include <TRint.h>
#include <qpushbutton.h>
int main( int argc, char **argv ) {
   // Create an interactive ROOT application
   TRint *theApp = new TRint("Rint", &argc, argv);
   // Create Qt object within ROOT application
   QPushButton hello( "Hello world!", 0 );
   hello.resize( 100, 30 );
   hello.show();
   // and enter the ROOT event loop...
   theApp->Run();
}
Under UNIX, you can build the stand-alone ROOT HelloWord Qt-based application with the command
g++ `root-config --cflags --glibs` -I$QTDIR/include -L$QTDIR/lib
-lqt-mt HelloWord.cxx -o HelloWord“Qt application” is the application that either instantiates the Qt QApplication and enters the Qt event loop or is the shared library that can be loaded into the already running Qt application via Qt plug-in mechanism. You must neither initialize ROOT TApplication / TRint nor enter the ROOT event loop. Qt-layer takes care about both of these steps. What you need is just to instantiate the embedded and regular ROOT objects of your choice and keep playing Qt rules. ROOT-based Qt applications treat the “native” style of the ROOT Gui.Backend and Gui.Factory parameters as “qt”. For example,
// Minimal ROOT based Qt example
#include <qapplication.h>
#include "TGraph.h"
#include "TQtWidget.h"
#include "TCanvas.h"

int main( int argc, char **argv ) {

   QApplication *app = new QApplication(argc, argv);
   TQtWidget *MyWidget= new TQtWidget(0,"MyWidget");
   // Create any other Qt-widget here
   MyWidget->show();
   MyWidget->GetCanvas()->cd();
   TGraph *mygraph;
   float x[3] = {1,2,3};
   float y[3] = {1.5, 3.0, 4.5};
   mygraph  = new TGraph(3,x,y);
   mygraph->SetMarkerStyle(20);
   mygraph->Draw("AP");
   MyWidget->GetCanvas()->Update();
   app->exec();
   return 0;
}
The code above can be converted into the running application using qmake, TrollTech provided, build utility. As soon as you have qmake project file HelloCanvas.pro:
# Automatically generated by qmake (1.07a) Sun Jun 26 02:03:47 2005
# Adjusted by hand to include $ROOTSYS/include/rootcint.pri file

TEMPLATE = app thread
CONFIG -= moc
INCLUDEPATH += .

# include "by hand" the qmake include file from
# ROOT distribution to define
#  1. include path to the ROOT system header files
#  2. the list of the ROOT shared libraries to link
#     Qt application against of
#  3. qmake rules to generate ROOT/Cint dictionaries

include("$(ROOTSYS)/include/rootcint.pri")

# Input
SOURCES += HelloCanvas.cxx
You can get the running ROOT-based Qt application with the Unix shell commands:
qmake HelloCanvas.pro
make
HelloCanvasIt is possible and desirable to create the ROOT-based Qt application with TrollTech provided qmake utility. To do that one should include one qmake include file, namely, $ROOTSYS/include/rootcint.priwith one extra line in the project file (as the example above has revealed). The include file defines all necessary components one needs to compile and link the healthy Qt application against of the ROOT shared libraries. It contains the qmake rules to create the ROOT/CINT dictionary from the list of the provided header files.
For example, we may convert the stand-alone Qt-based ROOT application above into C++ class with RootCint dictionary, that one loads into the interactive ROOT session and invokes interactively. This task requires four simple files.
LinkDef.h:#ifdef __CINT__
#pragma link off all globals;
#pragma link off all classes;
#pragma link off all functions;
#pragma link C++ class TMyQButton;
#endifTMyQButton.h:#ifndef ROOT_TMyQButton
#define ROOT_TMyQButton
#include "Rtypes.h"
class QPushButton;
class TVirtualPad;
class TMyQButton {
private:
QPushButton *fMyButton;
public:
TMyQButton(const char*name="");
virtual ~TMyQButton();
void SetSize(UInt_t w, UInt_t h);
void Show(Bool_t show=kTRUE);
void SetText(const char *text);
void SetOn(Bool_t on=kTRUE);
void SetStyle(const char * style);
};
#endifTMyQButton.cxx:#include "TMyQButton.h"
#include <qpushbutton.h>
// This class allow you to create and manipulate the QPushButton
// interactively
TMyQButton::TMyQButton(const char *name) {
// Create Qt QPushButton interactively
fMyButton = new QPushButton(name,0);
}
TMyQButton::~TMyQButton() { delete fMyButton; }
void TMyQButton::SetSize(UInt_t w, UInt_t h) {
// Resize the Qt button
fMyButton->resize(w,h);
}
void TMyQButton::Show(Bool_t show) {
// Show / hide the button
if (show) fMyButton->show();
else fMyButton->hide();
}
void TMyQButton::SetText(const char *text) {
// Set / change the button text
fMyButton->setText(text);
}
void TMyQButton::SetOn(Bool_t on) {
fMyButton->setOn(on);
}
void TMyQButton::SetStyle(const char * style) {
// Set button's look and feel
// The possible styles are defined by the local Qt installation.
// For example the possible style can be: "window","motif",
// "cde","sgi","motifplus","platinum","compact","windowsxp",
// "aqua","macintosh"
fMyButton->setStyle(style);
}qmake project file MyQButton.pro:TEMPLATE = lib dll thread
# Input
HEADERS += TMyQButton.h
SOURCES += TMyQButton.cxx
CREATE_ROOT_DICT_FOR_CLASSES = $$HEADERS LinkDef.h
include("$(ROOTSYS)/include/rootcint.pri")At this point, you are ready to produce the class-shared library with the ROOT/CINT dictionary by invoking two shell commands (as above):
qmake MyQButton.pro
make
In addition, get you class into the interactive Root session:
root[] gSystem->Load("libPlease, pay your attention that class implementation does not contain any Qt system initialization call. Since the above example is a ROOT application, do not forget, one needs the .rootrc file to assign “qt” value for the optionsGui.Backend and Gui.Factory.
Note: Do not mix the ROOT GUI and Qt GUI API within the same class implementation.
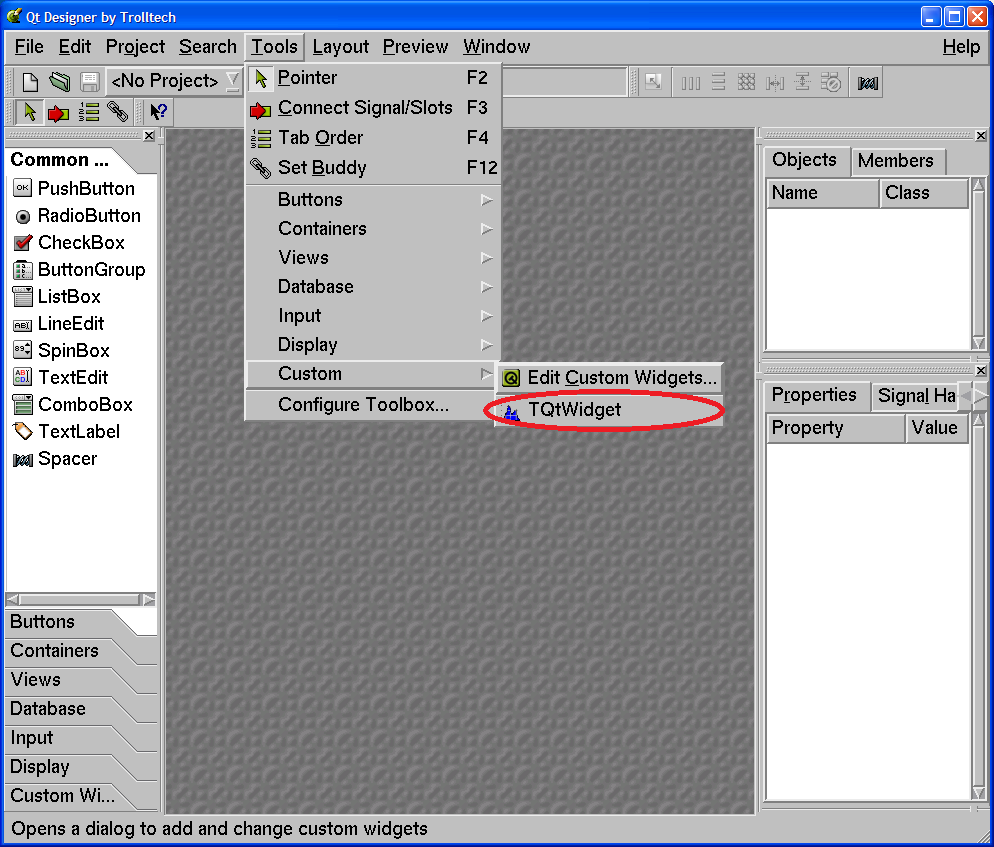
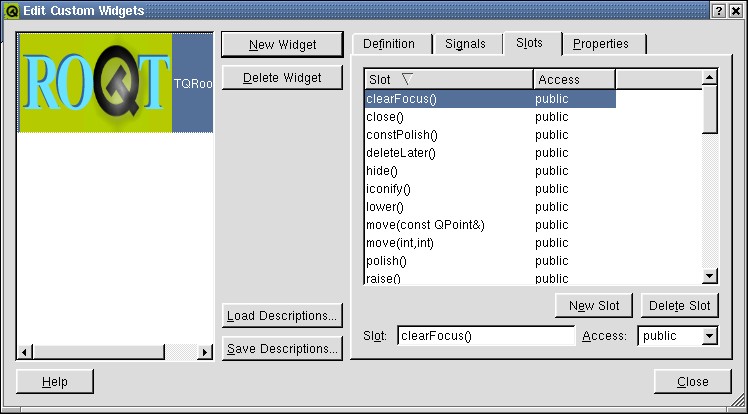
Qt package is equipped with Qt designer - a powerful tool to create the high quality, robust GUI interfaces for your applications. It is possible and desirable to use this utility to create the ROOT-based Qt GUI. To do that one should add the $ROOTSYS/include/rootcint.pri in the project file generated by designer and configure Qt designer to use the so-called “custom widget” defined by $ROOTSYS/include/TQtWidget.cw. The file defines the custom TQtWidget Qt widget to back the embedded TCanvas objects. To customize your designer start designer and select “Edit Custom Widget” menu:
Open “Edit Custom Widget” dialog and load the TQtWidget (“embedded” TCanvas) widget definition into the designer. One should do this at once. Designer will remember the last configuration and will be restoring it for all subsequent designer sessions.

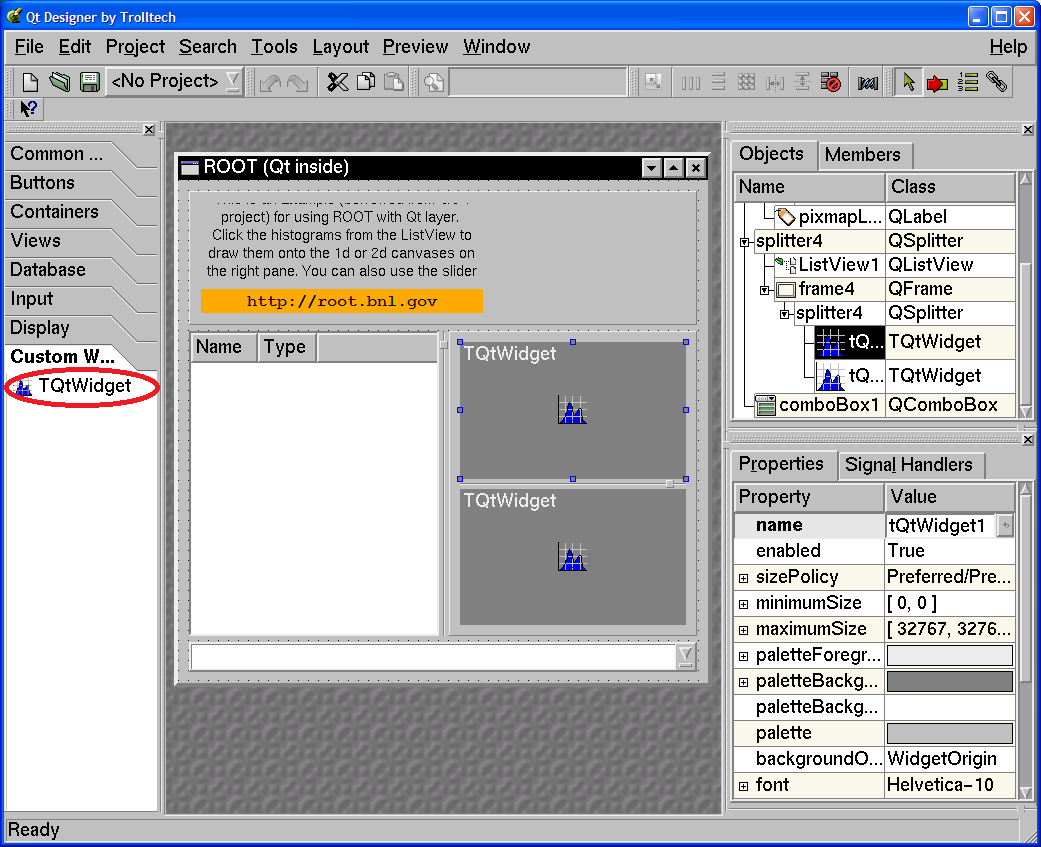
Now, you can create your shining GUI interface that contains TCanvas / TPad object with all features of these famous ROOT classes.
We strongly recommend you to read the “Quick Start” section of the Qt designer manual http://doc.trolltech.com/3.3/designer-manual.html. One can find further information, the examples of the working ROOT-based Qt projects including all examples of this section as well as the list of the references and publications on the Qt project Web site http://root.bnl.gov
Since the Qt package is a regular C++ class library to use it within ROOT C++ interpreter environment one should either load the dedicated RootCint dictionary or apply ACLiC mode.
For example, the following ROOT interactive session is to popup the “Open File” Qt dialog box and print out the file name selected by the user via the dialog.
root[] gSystem->Load("qtcint");
root[] cout << QFileDialog::getOpenFileName() << endl;
The ROOT session:
root[] gSystem->Load("qtcint");
root[] QPrinter p;
root[] p.setup();  // Display the Qt "Setup printer" dialog box
root[] Int_t id = gPad->GetPixmapID();
root[] QPixmap *pix = (QPixmap *)(TGQt::iwid(id));
root[] QPainter pnt(&p);
root[] pnt.drawPixmap(0,0,*pix);
is to display the Qt “Setup Printer” dialog and use QPrinter object to print the current TPad image to the selected printer. To use the more complex Qt-related code one is advised to apply “ACLiC - Automatic Compiler of Libraries for CINT” (see CINT the C++ Interpreter). For example:
#ifndef __CINT__
#  include <qfiledialog.h>
#  include <qstringlist.h>
#  include <qstring.h>
#endif
void FileDialog() {
   // This is small AClIC wrapper to use Qt 3.3 QFileDialog class
   // See: http://doc.trolltech.com/3.3/qfiledialog.html#getOpenFileNames
   // To use, invoke ACLiC from the ROOT prompt:
   // root [] .x FileDialog .C++
   QStringList files = QFileDialog::getOpenFileNames ();
   QStringList::Iterator it = files.begin();
   while ( it != files.end() ) {
      printf ("Next file selected: %sn", (const char *)(*it));
      ++it;
   }
}
With the ROOT ACLiC session:
root [0] .x FileDialog.C++
Info in <TUnixSystem::ACLiC>: creating shared library macros/./FileDialog_C.so
Next file selected: macros/QtFileDialog.C
Next file selected: macros/QtMultiFileDialog.C
Next file selected: macros/QtMultiFileDialog_C.so
Next file selected: macros/QtPrintDialog.C
Next file selected: macros/QtPrintDialog_C.so
the Qt generated “Open File Dialog” pops up and prints out the list of the selected files.
TQtWidget is a QWidget with the QPixmap double buffer. It is designed to back the ROOT TCanvasImp class interface and it can be used as a regular Qt Widget to create Qt-based GUI with the embedded TCanvas objects. It was mentioned the class can used as a “custom widget” to create the advanced GUI with the TrollTech “designer” utility.
To do that TQtWidget class can emit the set of the “Qt signals” and it is equipped with the collection of the dedicated “Qt slots”.
TQtWidget class inherits all slots of its base QWidget class (see: http://doc.trolltech.com/3.3/qwidget.html). In addition, it is in possession of two groups of the dedicated slots.
virtual void cd();
virtual void cd(int subpadnumber);
Make the associated TCanvas/TPad the current one, the proxy interface to the embedded TCanvas::cd() and TCanvas::cd(int subpadnumber) methods.
virtual bool Save(const QString &fileName) const
virtual bool Save(const char *fileName) const
virtual bool Save(const QString &fileName,const char *format,
                  int quality=60) const
virtual bool Save(const char *fileName,const char *format,
                  int quality=60) const
The slots are to save the double buffer of the TQtWidget object using the default or specified save format. The default save format is defined either by the “known” file extension or by the “default” file format.
The default format can be changed by TQtWidget::SetSaveFormat method and it is set to be “PNG” at the class constructor.
The class object emits the different signals that can be used to create the sophisticated GUI applications.
The signal CanvasPainted() is emitted to notify the GUI that the double buffer of the widget has been filled and buffer has been painted onto the screen. In the other words, this signal means that all TObject objects of the embedded TCanvas have been visualized on the screen. The signal:
Saved(bool ok)is emitted to notify the GUI that a TCanvas has been saved into the file:
RootEventProcessed(TObject *selected, unsigned int event, TCanvas *c)This signal notifies the Qt framework that the Qt mouse/keyboard event has been process by ROOT. The signal is disabled by default, i.e. the connected slot is not called unless the signal is explicitly enabled with TQtWidget::EnableSignalEvents method.
For example, to create a custom response to the mouse crossing of a TCanvas, you need to connect the RootEventProsecced signal with your qt slot. The next piece of the code demonstrates that:
connect(tQtWidget,SIGNAL(RootEventProcessed(TObject *,
                         unsigned int, TCanvas *)),
this,SLOT(CanvasEvent(TObject *, unsigned int, TCanvas *)));
. . .
void qtrootexample1::CanvasEvent(TObject *obj, unsigned int event,
                                 TCanvas *)
{
   TQtWidget *tipped = (TQtWidget *)sender();
   const char *objectInfo = obj->GetObjectInfo(tipped->GetEventX(),
   tipped->GetEventY());
   QString tipText ="You have ";
   if  (tipped == tQtWidget1)
      tipText +="clicked";
   else
      tipText +="passed";
   tipText += " the object <";
   tipText += obj->GetName();
   tipText += "> of class ";
   tipText += obj->ClassName();
   tipText += " : ";
   tipText += objectInfo;

   QWhatsThis::display(tipText)
}The Qt Interface developed at Darmstadt GSI is a lightweight interface that enables the user to write a Qt 3 application, which can use ROOT. The Native Qt 4 support is planned and will be available in the near future. Furthermore, existing Qt 3 Application can use this interface to have almost full access to the Root functionality (see “Create the Main file for the project” below). Using this interface a full access to both ROOT and Qt widgets is possible in one application.
An Embedded Root canvas can be set inside any Qt widget by C++ calls or using the Qt designer. To use the Qt 3.x designer to make ROOT applications with Qt GUI’s follow the steps described below:
Start the designer
In the designer menu choose tools->custom->Edit Custom Widget
In the Edit Custom Widget window choose “Load Description”
From GSI Qt-Root interface directory load the file “TQRootCanvas.cw”
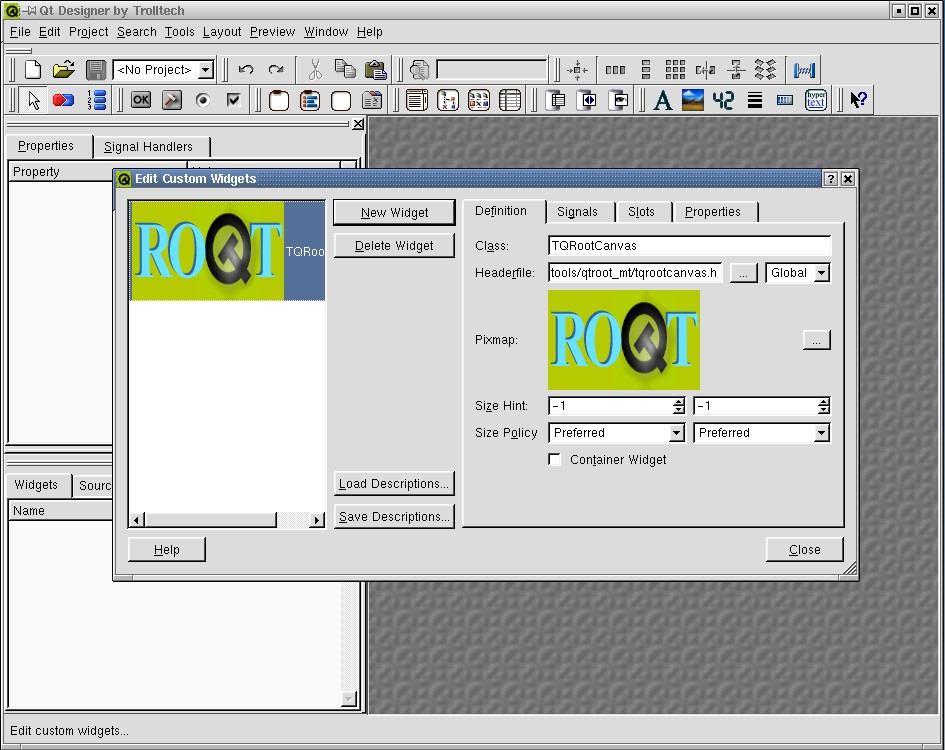
Now you will see the TQRootCanvas in the Class field, you will also see all other parameters, signals, slots and properties of the TQRootCanvas.

Now we are ready use the TQRootCanvas within the Qt 3.x designer.
1). Choose “File->New”
2). Select C++ Project
3). Create the Project in a directory of your choice.
4). In the project settings (Project->Setting from the designer main window) select the C++ tab. Add ROOT and GSI Qt-Root libraries into the Libs entry field. For example:
-L(ROOTSYS)/lib -lCore -lCint -lHist -lGraf -lGraf3d -lGpad -lTree -lRint -lPostscript -lMatrix -lPhysics -lnsl -lm -ldl -rdynamic -lqtgsi
Add $(ROOTSYS)/include into Includepath entry field.

These setting will be saved in project.pro file and qmake will generate the Makefile according to them.
Now you can create your own widgets in the designer and add them to the project.

The main file should look like:
#include "TQtApplication.h"
#include "TQtRootApplication.h"
#include "MyWidget1.h"
int main( int argc, char ** argv ){
    TQRootApplication a( argc, argv, 0);
    TQApplication app("uno",&argc,argv);
    MyWidget1 *w = new Mywidget1;
    w->show();
    a.connect(&a, SIGNAL(lastWindowClosed()), &a, SLOT(quit()));
    return a.exec();
}